Premium/ Get the most out of your camera
Surely many of us adore the output of the Fujifilm JPG engine. We all like to have our Provia, ClassicChrome or ClassicNegative film simulations at hand or maybe even use so-called “recipes”.
It’s perfectly fine, but sometimes we like, wish, or have to deal with RAWs.
Since every seasoned amateur or pro photographer has heard about big players on the market as Lightroom or Capture One, I’d like to share with you my concepts of usage and basic workflow with darktable.
Darktable is an OpenSource application to manage your photos library and develop raw images. It is free of charge – you don’t have to pay for a license key, subscription plans, or anything, though you may support the developers by making a donation if you wish.
Speaking of developers, you can reach them really easily e.g. via discuss.pixls.us forum, and believe me, they’re walking encyclopedias about physics of light and colour theory. As is the nature of OpenSource, everyone can share his or her voice, effectively shaping the future versions of darktable.
It’s a cross-platform app – you can download it for Windows 64-bit or MacOs by visiting the site: darktable.org or have it installed on your Linux machine right from the repository of your distro.
To have it run smoothly, it is advised to work on a machine with at least a quad-core CPU, more than 4 GB of RAM and dedicated Nvidia or AMD GPU with OpenCL enabled. It really depends on if you use maths-heavy functions (modules) of darktable and how many megapixels your images have.
My current setup is far from being modern: 3rd gen. Intel i7-3770, 16 GB of RAM (DDR3) and GTX 1050 Ti, but it handles 16 Mpx RAFs from Fujifilm X-T1 and 20 Mpx Canon 6D files really well.
The rest of the article will be similar to a tutorial, but bear in mind – darktable is an extremely powerful and (can be) complex application. My goal is to give you a nice jump start using my experience and idea of how to quickly and automatically get a nice, crisp image, alter it with some classics like graduated or radial filter so you could go even with hundreds of images like a breeze… and then experiment as much as you wish!
Prerequisites
To follow my workflow, after installing darktable, first you need to click the gear icon and look into preferences:
In the “Processing” tab, reflect my settings. As for the “3d LUT” folder, everyone has a different location, so if you use LUTs, you may tell darktable where to look for them on your hard drive.
Lighttable
There’s a place you may find similar to Lightroom’s “Library”. You can import your images from their current location on your drive or copy them straight from the memory card to the desired place.
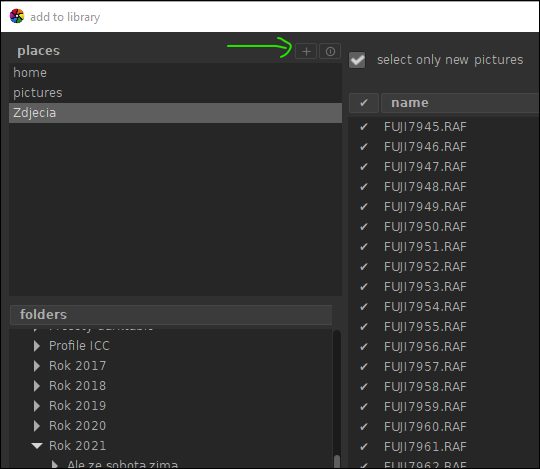
Personally, I like to manually copy my images from SD card to local hard drive using Windows Explorer, so all I need to do is to click the “Add to library” button.
If you wish to select your pictures’ location, use the small “plus” icon and navigate to the folder.
CONTINUE READING…
Only for Premium Subscribers!
To access these articles you must be a PREMIUM subscriber to Fuji X Passion.
SUBSCRIBE NOW and get instant access to all Premium articles, all prior and upcoming magazines, all special editions, all previous videos, discounts and offers. If you are seeking relevant information about this camera system, or useful tips from photographers using the Fuji X system, this is the most valuable place for you.
BASIC Plan subscriber? Upgrade to PREMIUM!
- Access your account HERE and sign in with your email address and password as always
- In this step click the ‘Subscriptions’ tab and then ‘Change plan’
- Now you can change from the BASIC plan to the new PREMIUM PLAN
- Finally, the system will only apply a proportional value to the remaining charge and change the plan immediately.
Already a Premium Subscriber?


