Why I Converted my Fuji X-Pro 1 camera to Infrared
Twenty months ago I bought a Fujifilm X-Pro 1 camera. I was so impressed by it that I also bought an X-T1. Since then I’ve hardly used the X-Pro 1, which was relegated to the status of backup camera / second body.
When I started out in photography I read repeatedly that you should always have a backup body, in case your main one stops working. That could be the worst advice I’ve ever read. I can understand why pros need second bodies (it would be foolish to go on a commercial shoot without a backup of some sort) – but not only have I never had a camera go wrong, I always end up using one camera all the time, and the other one just doesn’t get used. The way digital cameras depreciate, that’s just wasted money.
I did have the idea that I could use the X-T1 and X-Pro 1 in conjunction, each with a different lens, and just switch when needed. But the cameras operate so differently that it’s hard to move from one to the other. Plus, the extra body adds weight and I prefer to travel as light as possible.
I thought about selling the X-Pro 1 body, but even before the X-Pro 2 was released the resale value wasn’t very high. Then it occurred to me – why not get it converted to infrared? This is something I’ve had at the back of my mind for many years, and never got around to. I’m glad I never tried it with an old Canon camera, because the X-Pro 1 has a few features that make it highly suitable for an infrared conversion.
- My main interest in infrared is for black and white photography. With the X-Pro 1, I can set the camera profile to black and white and the camera displays the image in monochrome in the viewfinder. This makes it really easy to visualise the result, especially in infared where the tones look nothing like they do in real life.
- I also like to use the square format. Similarly I can set the aspect ratio to 1:1 and the camera displays the cropped scene in the viewfinder.
- The X-Pro 1 displays a timer on the LCD screen for bulb exposures, showing how much time has elapsed. This makes long exposure photography very easy, and is something I plan to test out with this infrared camera.
- The X-Pro 1 uses contrast detection autofocus, a benefit of which is the camera can focus accurately on infrared light as well as visible light. There is no need to adjust the focus point of the camera as you would have to do with a digital SLR using phase detection autofocus.
What does an infrared conversion involve?
This is my understanding of how infrared conversions work. Digital camera sensors are sensitive to visible light (that which can be seen by humans), ultraviolet light and infrared light. Because most people only want a camera to record what we see with our eyes, there are filters to block both UV and infrared light in front of the sensor, so that only visible light reaches it.
The infrared filters on most cameras let some infrared light through, but so little that it doesn’t adversely affect the image.
The infrared conversion simply removes the infrared filter so that the sensor can now see infrared. It replaces it with a filter that blocks visible light, so the sensor can only see (and record) infrared wavelengths.
You have several choices for your infrared conversion (these probably vary depending on the options offered by whoever does it for you).
Full spectrum conversion. The UV and infrared filters are removed so that your camera can see all three types of light wavelengths. You place a filter on the camera to control the effect. You can buy different filters to let different amounts of visible and / or infrared light through. The advantage is in flexibility, especially if you like to experiment. The disadvantage is that filters add to the cost, and also block light, meaning you have to use higher ISOs, slower shutter speeds or both.
720nm conversion. The sensor is fitted with a filter that blocks all wavelengths under 720nm (nm = nano-meter and is a unit of measurement equivalent to 1/1,000,000,000 metre used for measuring wavelengths of light) . This simply means that infrared light only reaches the sensor. This is what I had done on my camera. It is the most suitable for landscape photography and portrait photography in infrared. It gives you a colour image that’s easy to convert to black and white.
830nm conversion. The sensor is fitted with a filter that blocks all wavelengths under 830nm. This gives a more intense type of infrared effect, with very little colour.
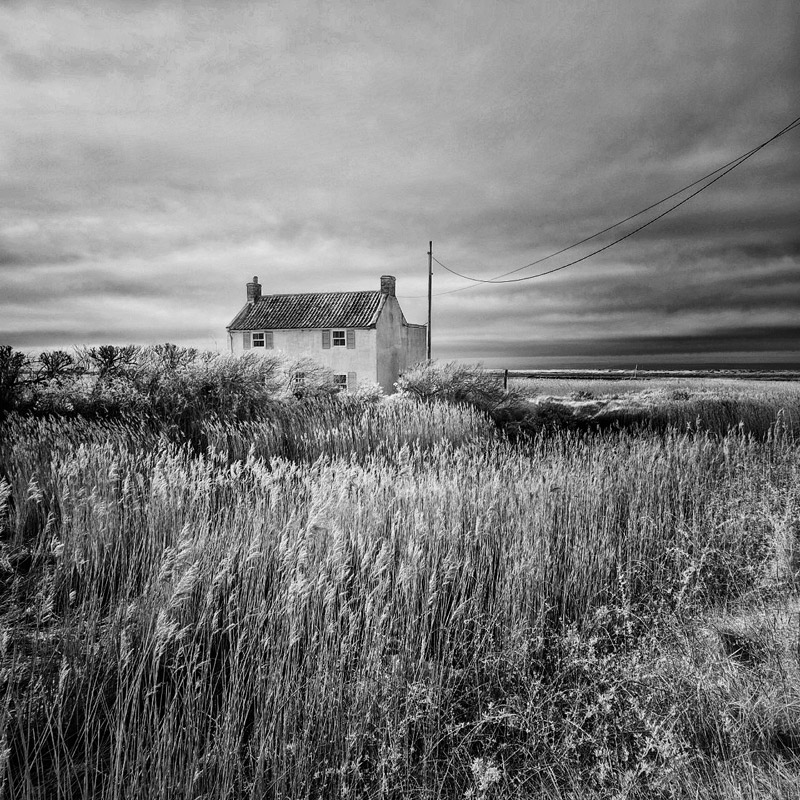
The infrared conversion on my camera was carried out by Protech Photographic in the UK. I received the camera a week ago and have been playing with it ever since. All the photos in this article were taken with it.
Can’t I just buy an infrared filter for my camera?
Yes you can. The Hoya R72 filter is popular and blocks all wavelengths under 720nm, just like the conversion I had done to my X-Pro 1. The advantage of this is that you can buy the filter to experiment with infrared photography without committing to an infrared conversion (which only makes sense if you have a second camera body you can spare).
The disadvantage is that the combination of the filter and the infrared blocking filter in your camera means that very little infrared light reaches the sensor. The exact figure varies depending on your camera and the strength of its infrared blocking filter, but it seems you should expect a light loss of ten stops or more (some sensors may not be sensitive to infrared at all). This means that you have to use a tripod and expect shutter speeds of a minute or more in most cases – making it a useful technique for landscape or architectural photography but not much else. Really, what you’re doing here is another version of long exposure photography.
Are there any other considerations?
Yes there are. Not all camera lenses are suited for infrared photography. You may see a hot spot at the centre of the frame, and its more prevalent when using older lenses and at wider apertures. There is a good list of suitable lenses here.
The verdict
I’m very happy with my infrared conversion. Instead of sitting unused in my camera bag waiting for something bad to happen to my X-T1, my X-Pro 1 has got a new lease of life. It’s like having a purpose built black and white camera, but one that is sensitive to infrared rather than visible light. I’m pleased that I had the conversion done rather than sell the camera.
I haven’t worked out the best way to process the photos yet (I’m still experimenting with that), but the photos you see here were all processed with the Snapseed app on an iPad.


tedjerome
June 22, 2016 @ 7:51 pm
What a great idea! (Nice photos, too!) I just dragged my old XE-1 around the UK for three weeks purely as a backup for my XT-1, and never took it out of my bag. Would have been much more fun as an infrared camera! I’ll need to find a good US-based conversion company.
Steven
June 23, 2016 @ 10:21 am
I did the conversion with my X-Pro1 too and the pictures are really lovely.
Your pictures seem to be a bit dark and the special effect is’nt as clear as with mine…
Forgotten to take a WB?
Steven
June 23, 2016 @ 10:23 am
Sorry, my comment goes to the thread opener…
Andrew S. Gibson
June 23, 2016 @ 4:39 pm
Hi Steven, it’s probably just the processing. These images are processed in Snapseed on my iPad and I pulled the highlights back to lessen the infrared effect. Not all of these photos are taken in bright sunlight either, some of them are taken in overcast conditions which also leads to a less dramatic effect.
orbec
June 23, 2016 @ 7:15 am
Great writeup just like tedjerome I too have my old X-E1 which I love but rarely use & can’t bear to part with it for peanuts & as a huge fan of B&W I think I’ll give this a go. Cheers…
Andrew S. Gibson
June 23, 2016 @ 4:41 pm
Yes, you definitely should. I didn’t want to sell my X-Pro 1 for peanuts either and the conversion will help me enjoy using it for many years to come.
Alan B
April 11, 2017 @ 8:11 am
Really glad I came upon this blog – my XT20 is on it’s way and I can’t bear to part with my XT10 and I too LOVE B&W photography and marvel at other people’s creations. Couple of questions if I may? After recently buying a 720nm IR filter I then realised that the processing was highly involved and required a long photoshop process. I only use Capture One, so quickly dismissed this option. Am I right therefore in thinking that the images coming out of a converted Fuji will very quickly be processed or even be used SOOC? Love your shots too.